Contents
- Purpose
- Pre-requisites
- Web Portal - Emberair
- Web Portal - Other Home Automation Devices
- Mobile App - Emberair
- Mobile App - Other Home Automation Devices
Purpose
This is an an installation guide for the installation of Home Automation Devices, its purpose is to outline the installation process and provide guidance of what to expect at each step. The instructions in this document should be followed for a successful installation.
Pre-requisites
Before completing this process, please ensure that any hardware setup required has already been completed
Web Portal - Emberair
How to use your Emberpulse web portal to install your Emberair device
- Log on to your Emberpulse web portal at emberpulse.com.au
- From the top navigation menu, select ' Connected Devices'

- On the CONNECTED DEVICES page, select 'Add Air Conditioning Control...'

- On the CHOOSE YOUR AIR CONDITIONING CONTROL page, select 'Emberair'

- You will be presented with the following screen (or similar), select 'Add'

- The 'Add Air Conditioning Control...' button will now change to red, show the text "Searching for A/C controls" and will provide a countdown timer
This indicates that your Emberpulse is ready to connect new devices to its network. The countdown timer shows the remaining time during which new connections will be initiated.

- Wait until the Emberair device appears at the top of the list of connected devices.
This may take a few seconds. When the Emberair device has been identified by your Emberpulse, you will see a new icon appear at the top of the list of connected devices on the CONNECTED DEVICES page. You will initially see a spinning grey icon. This indicates that the connection process is ongoing.
The connection process for the device may take a few minutes and during this time the countdown timer will continue counting down to zero.
The counter may even reach zero before the connection process has completed. This is quite normal as the timer only indicates the time during which new connection processes can begin; as long as the connection process has begun before the timer expired, it will continue to completion no matter what the timer does.

If, after the countdown time has reached zero and your Emberair device has not appeared at the top of the list of devices, please repeat from Step 3.
If a second attempt does not result in a connected device, try moving the device closer to your Emberpulse before trying again. If this does not help, contact Emberpulse Support.
Once the connection process if fully complete, the spinning grey icon will change to a coloured icon as shown below.

This indicates that you have successfully connected your Emberair device to your Emberpulse.
Web Portal - Other Home Automation Devices
How to use your Emberpulse web portal to install your Home Automation Devices
- Log on to your Emberpulse web portal at emberpulse.com.au
- From the top navigation menu, select ' Connected Devices'
- On the CONNECTED DEVICES page, select 'Add Device...'
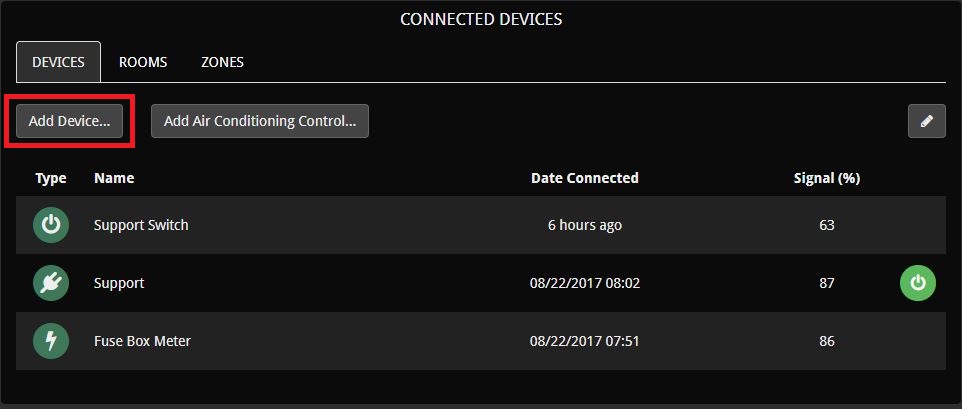
- The 'Add Device...' button will now change to red, show the text "Searching for devices" and will provide a countdown timer
This indicates that your Emberpulse is ready to connect new devices to its network. The countdown timer shows the remaining time during which new connections will be initiated.

- Wait until the new home automation device appears at the top of the list of connected devices.
This may take a few seconds. When the new device has been identified by your Emberpulse, you will see a new icon appear at the top of the list of connected devices on the CONNECTED DEVICES page. You will initially see a spinning grey icon. This indicates that the connection process is ongoing.

The connection process for the device may take a few minutes and during this time the countdown timer will continue counting down to zero.
The counter may even reach zero before the connection process has completed. This is quite normal as the timer only indicates the time during which new connection processes can begin; as long as the connection process has begun before the timer expired, it will continue to completion no matter what the timer does.

If, after the countdown time has reached zero and your new home automation device has not appeared at the top of the list of devices, please repeat from Step 3.
If a second attempt does not result in a connected device, try moving the device closer to your Emberpulse before trying again. If this does not help, contact Emberpulse Support.
Once the connection process if fully complete, the spinning grey icon will change to a coloured icon as shown below (or similar).

This indicates that you have successfully connected your home automation device to your Emberpulse.
Mobile App - Emberair Device
- Open your Emberpulse mobile app
- Select 'Control' from the navigation menu located at the bottom of the screen

- Select '+ Add Device'

- On the ADD DEVICE page, select 'Emberair Device'

- A message will indicate that the Emberpulse is searching for your Emberair device.
This indicates that your Emberpulse is ready to connect new devices to its network. The countdown timer shows the remaining time during which new connections will initiated.

- Once your Emberair device has been found, a new Emberair device will appear on your Connected Devices list. Your Emberair device is now installed.

Mobile App - Other Home Automation Device
- Open your Emberpulse mobile app
- Select 'Control' from the navigation menu located at the bottom of the screen
- Select '+ Add Device'

- On the ADD DEVICE page, select 'Zigbee Device'

- A message will indicate that the Emberpulse is searching for home automation devices.
This indicates that your Emberpulse is ready to connect new devices to its network. The countdown timer shows the remaining time during which new connections will initiated.

- Once your home automation device has been found, the device will appear on your Connected Devices list. Your home automation device is now installed.
